What recipe collection would be complete
without adding something to satisfy that sweet tooth?
Not all of these recipes are vegan, since several of them are "old" family recipes. But check out my notes on how to veganize, and please share your accomplishments!
And considering that my children have celiac disease, I've been adding GF instructions to some of these recipes. Those marked *yellow* have been tested by me with excellent results! The recipes marked with *orange* actually started out as GF recipes, and knowing me, these happen to also be dairy free. This is just a start, but hoping that some of you GF bakers with more experience can suggest some recipes for me to add!
CAKES
Death by Chocolate Cake

Death by chocolate. What more can I say? This is the only chocolate cake recipe you will ever need. It is super moist and very chocolaty. This was my girls' go-to birthday cake request for as long as I can remember!
I have to give credit for this recipe to Ruth, my old co-worker, friend, and awesome baker. She would come over to our house once per month so we could bake something for the monthly birthday gatherings at work. And the girls will also remember Ruth bringing over awesome homemade gingerbread houses during the Christmas season!
- 1/2 cup water
- 1/2 cup oil
- 1 cup sour cream
- 4 eggs
- 1 box Chocolate Fudge super moist cake mix
- 1 small packet of chocolate fudge Jello instant pudding
- 1 12-oz package Giradelli chocolate chips
- Mix water, oil, sour cream and eggs.
- Mix together cake mix and instant pudding. Add to moist mixture.
- Stir in chocolate chips.
- Place in greased and floured bundt pan.
- Bake for 1 hour at 325℉.
Let cool, and sprinkle with powdered sugar. You will find out that this cake does not need icing.
To convert to GF, simply use a GF cake mix box.
Banana Bundt Cake with Cinnamon Cream Cheese Frosting
I was introduced to this yummy banana cake by my friend Nancy. It is super moist and tasty. I have not yet tried the GF alternative, so if anyone tries it please let me know how it goes! And check out these vegan substitutes.
- 2 cups all purpose flour (check GF option below)
- 1 tsp baking powder
- 1 tsp baking soda
- 1/2 tsp salt
- 1/3 cup butter, softened
- 1-1/4 cups light brown sugar
- 2 eggs
- 1 tsp vanilla extract
- 3 medium overripe bananas (mashed, about 1-1/4 cups)
- 1 cup sour cream (or yogurt, or dairy free sour cream)
- 1/2 cup chopped pecans, plus 1/4 cup for topping
Gluten Free Alternative for flour (or use GF 1-1 baking flour):
- 1-1/2 cups brown rice flour
- 1/2 cup tapioca starch
- 1/4 cup potato starch
- 1-1/2 tsp xanthan gum
Frosting Ingredients:
- 4 oz cream cheese, softened
- 1-1/2 cups powdered sugar
- 1 tsp vanilla extract
- 1/2 tsp ground cinnamon
- About 2 TBSP milk, adjust as needed
For the cake:
- Preheat oven to 350℉. Generously grease a 10-12 cup Bundt pan with butter and then dust with flour. Set aside.
- Whisk together the flour, baking powder, baking soda and salt in a small bowl. In a large mixing bowl, beat the butter and the sugar with an electric mixer until light and fluffy.
- Add the eggs and vanilla and beat again. Stir in the banana, and then add half of the dry ingredients. Stir until combined and then stir in 1/2 cup chopped pecans.
- Pour the batter into the pan and spread evenly. Bake about 40-45 minutes, until toothpick inserted comes out mostly clean or with crumbs. Note that Nancy suggested baking for only 35 minutes. Cool 5 minutes in pan and then invert on wire rack to cool completely.
To make the frosting:
- Combine the cream cheese, powdered sugar, vanilla, and cinnamon in a large mixing bowl. Beat until fluffy, adding a tablespoon of milk and then an additional teaspoon at a time to reach the desired consistency.
- Spoon the frosting over the completely cooled cake and sprinkle with remaining pecans. Serve immediately or refrigerate until ready to serve. Store covered in the refrigerator for 3-4 days.
Enjoy!
** Recipe adapted from Taste of Home
Carrot Cake with Cream Cheese Frosting
I've used this carrot cake recipe for decades, and it's from a very worn hard-cover "Joy of Cooking" book. I really love carrot cake, probably because it always turns out moist and I love the cinnamon flavor.
Funny story about this cake. I worked at an Asian company for many years, where 90% of the employees were from China. Whenever I brought this cake to a potluck, the Chinese folk refused to eat it because it contained vegetables!! If I hadn't told them it was a carrot cake, they probably would have loved it.
This recipe is great as a GF cake, just replace the flour with a 1-1 GF flour. I've also added a DF option for the icing that tastes great.
- 1 cup all purpose flour (or 1-1 GF flour), sift before measuring!
- 1 tsp baking soda
- 1 tsp double-acting baking powder
- 2 tsp cinnamon
- 1/2 tsp salt
- 2/3 cups vegetable oil
- 1 cup sugar
- 2 beaten eggs
- 1/2 cup chopped nuts (optional)
- 1 1/2 cups grated carrots
Icing Ingredients:
- 3 oz. cream cheese, softened
- 1 TBSP milk, adjust as needed
- 1 tsp ground cinnamon
- 3/4 cups powdered sugar
- 2 tsp grated orange rind
Icing ingredients for a dairy free option (makes a large quantity):
- 1/2 cup vegan butter (room temperature)
- 8 oz. vegan cream cheese
- 1 tsp vanilla
- 1 tsp ground cinnamon
- 3-4 cups powdered sugar
- 2 tsp grated orange rind (optional)
For the cake:
- Preheat oven to 325℉. Grease and flour an 8" square pan.
- Sift together the flour, baking soda, baking powder, cinnamon and salt.
- Mix together the oil, sugar and eggs. Add to flour mixture, stirring well.
- Add and blend in the nuts (optional) and carrots.
- Bake for 45 minutes (check after 30 mins). I wiggle the pan to make sure the batter is not liquid, or check with a toothpick.
To make the icing:
- Beat all ingredients except the powdered sugar and orange rind.
- Beat in the sugar gradually. Adjust milk as needed to reach the desired consistency.
- Add the orange rind.
Enjoy!
Jewish Apple Cake

I've had this recipe for a long time, and honestly don't remember where it came from so can't give anyone credit! In case you're wondering, a Jewish Apple Cake is "a dense cake made with apples". Unlike most American butter-based cakes, Jewish Apple Cake is made with vegetable oil, thus making it acceptable after a meat meal under the Jewish dietary laws that prohibit mixing meat and milk.
Layering the cake batter and the apples takes a little bit of finesse, so here are some tips. First, the batter will be fairly thick, so won't spread nicely into the pan. But don't bother to spread it out with a spatula since the batter will then stick to the spatula and things just get messier! Secondly, make each layer of batter very thin and the apple layer very generous, and don't worry about covering all of the apple. When in the oven, the batter will spread out and rise, so you will have much more cake than you initially might think.
I've made this cake gluten free by replacing the regular flour with 1:1 GF flour. The image shows the typical state of this cake: messy and mostly gone!
- 5-6 medium Granny Smith apples (7-8 cups), peeled and sliced
- 2 TBSP cinnamon
- 5 TBSP sugar
- 4 eggs
- 2-1/4 cups sugar
- 1 cup vegetable oil
- 1/3 cup orange juice
- 2 tsp vanilla
- 3 cups flour (can also use any 1:1 GF flour)
- 1 TBSP baking powder
- Preheat oven to 350℉. Grease and flour a 10-12 cup Bundt pan.
- Sprinkle the sliced apple with the cinnamon and sugar. Toss well to cover and set aside.
- Combine the eggs and sugar. Add the wet ingredients followed by the dry ingredients. Mix well. The batter will be thick.
- Alternate layers of batter and apples in the Bundt pan (see notes above).
- Bake for 1-1/2 to 1-3/4 hours. Loosen from pan and remove to cool on a rack.
- Since this cake is loaded with apple, thin slices will fall apart so indulge in a nice thick slice of cake!
Orange Marmalade Cake
It probably sounds strange to make a cake with marmalade. But from my perspective, I get hundreds of oranges from my trees each January, make dozens of jars of marmalade, and typically have leftover jars the following year. So I'm motivated to find ways to use up that old marmalade!!
So here is a yummy Bundt cake with a hint of orange. This is a dense cake, so won't rise as much as you might expect. But the marmalade makes it nice and moist, great served with a cup of coffee or tea!
- 1-1/2 cups all-purpose flour
- 1 tsp baking powder
- 1 tsp ground cinnamon
- 1/4 tsp salt
- 1/4 tsp ground cloves
- 1/4 tsp ground nutmeg
- 3 large eggs
- 2/3 cups margarine, melted
- 2/3 cups white sugar
- 1/3 cup non-dairy milk
- 1 TBSP lemon juice
- 3/4 cup orange marmalade
- Preheat oven to 350℉. Grease and flour a 10-inch Bundt pan.
- Sift together flour, baking powder, cinnamon, salt, cloves and nutmeg in a bowl; set aside.
- Stir together eggs, melted margarine, sugar, milk and lemon juice in a large mixing bowl. Add flour mixture to egg mixture; mix until well blended. Stir in marmalade until combined. Pour batter into the prepared Bundt pan.
- Bake in the preheated oven until cake springs back when lightly touched, 45-60 minutes. Cool for 10 minutes in the pan before inverting onto a wire rack to cool completely.
GF note: I did try to make this with 1:1 Gluten Free flour, but found that the cake did not rise enough. It was tasty, but somewhat gooey. I suspect that the extra moisture from the marmalade was part of the problem. My good friend who was there to taste-test with me suggested that adding 1/2 cup extra flour and 1 tsp baking soda might help make it less dense. I'll let you all know once I give it a try!
** Recipe adapted from allrecipes.com
Cranberry Orange Coffee Cake
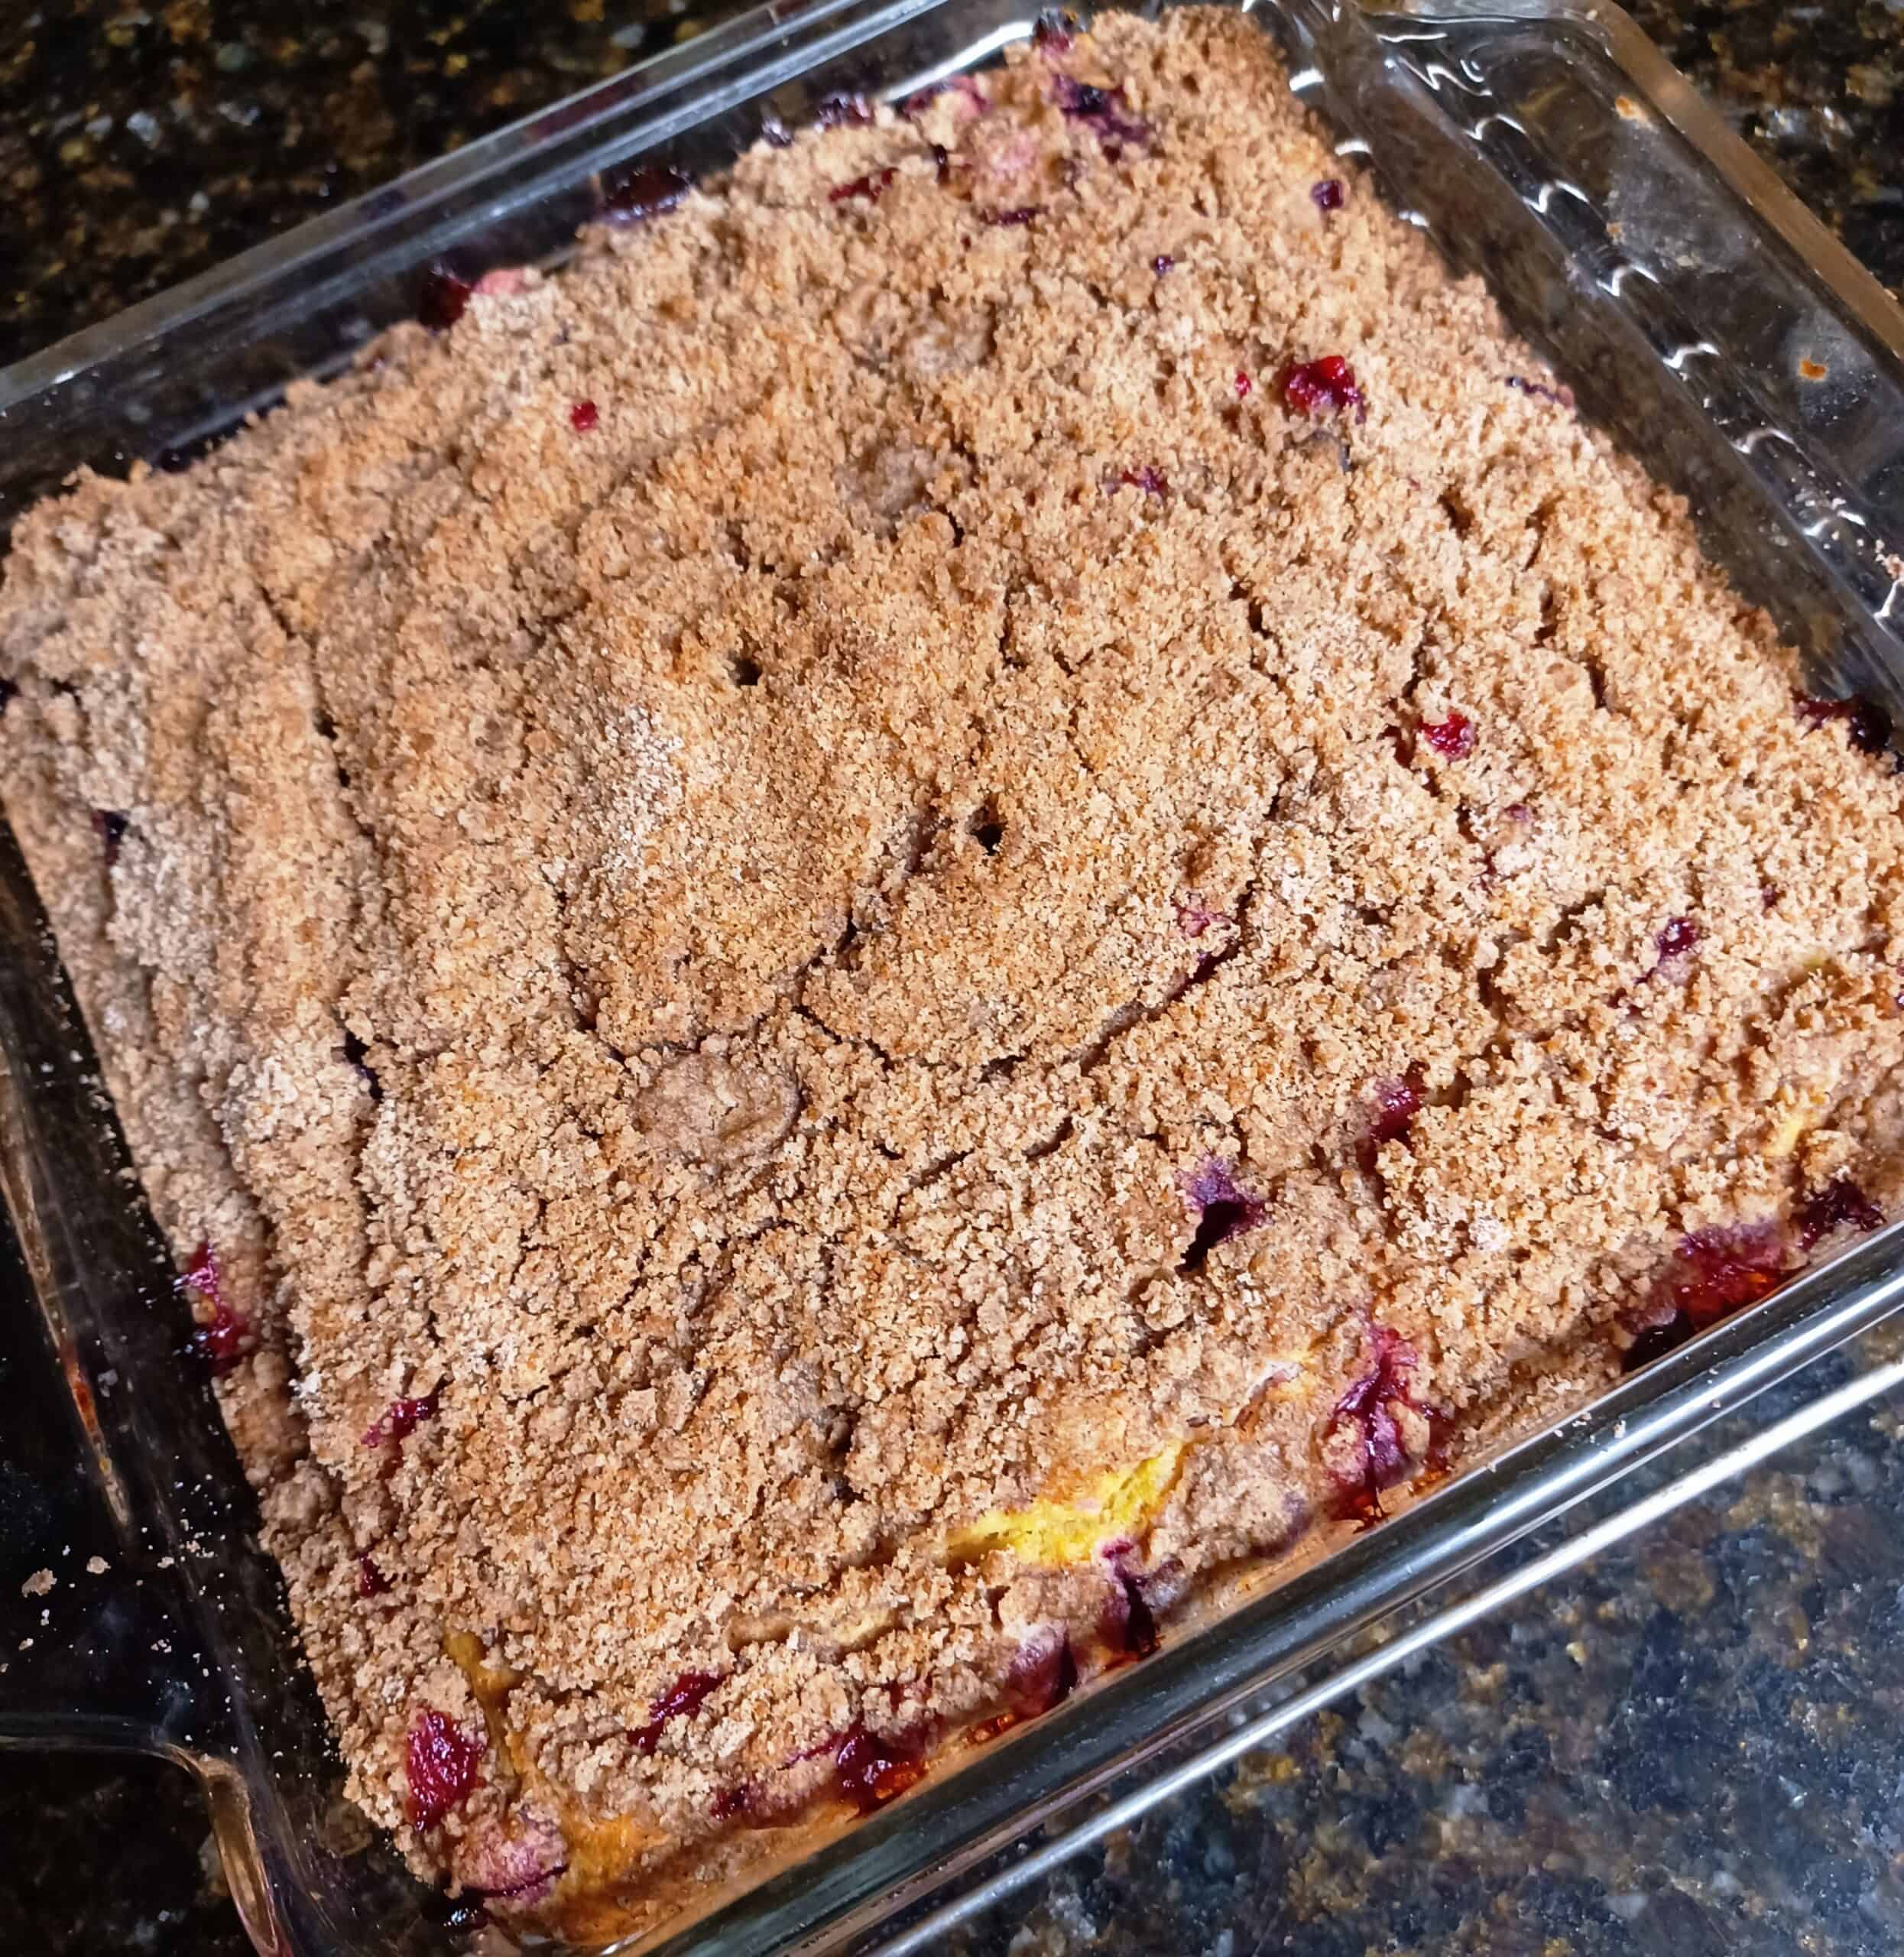
This is simple GF coffee cake with a yummy cinnamon crumb topping, and is quick and easy to make. This is also dairy free when using non-dairy milk and stick margarine instead of butter. It's important to use the gluten free 1-1 "measure-for measure" baking flour, otherwise you have to fiddle with adding xanthan or guar gum.
With the cranberries and the orange juice and zest, it's a great option for Christmas brunch!
For the cake:
- 2 cups gluten free 1-1 baking flour
- 3/4 cup sugar
- 1/2 tsp baking soda
- 1 tsp baking powder
- 1/8 tsp salt
- 1.5 cups fresh cranberries
- 2 large eggs
- 1/2 cup stick margarine, softened
- 1 cup non-dairy milk
- 2 TBSP orange juice
- 2 TBSP orange zest
Crumb topping:
- 3/8 cup gluten free 1-1 baking flour
- 3/8 cup brown sugar
- 2 tsp ground cinnamon
- 3 TBSP stick margarine, chilled
- Preheat oven to 350℉.
- In a large bowl, mix the cake dry ingredients.
- Add the cranberries to the dry mixture and mix until coated.
- Combine the wet ingredients and whisk to blend. Add to the dry ingredients and mix gently. Do not use an electric mixer, since this will make your cake too dense.
- Pour the cake mixture into an 8X8 baking dish. Let this sit while mixing up the crumb topping.
- In a medium sized bowl, combine the topping ingredients. Use a pasty cutter to cut the margarine into the sugar mixture until mixture is crumbly. Sprinkle over the cake batter.
- Bake for 40 minutes or until a toothpick into the middle of the cake comes out clean. If you see crumbs or batter, or the cake batter jiggles in the pan, bake a little longer!
- Cool on a wire rack.
** Recipe adapted from fearlessdining.com
COOKIES and SQUARES
Tasha's Awesome Chocolate Chip Cookies
{ Tasha } These are cookies that you’ll be proud to share. They’re my go-to cookie to bake for events!
- 1/2 cup coconut oil, solid but scoopable
- 1-1/4 cups light brown sugar, packed
- 2 tsp vanilla
- 1/4 coconut milk (the thicker Thai variety, in a can)
- 1/4 cup applesauce
- 2-1/3 cup flour
- 1 tsp baking soda
- 1/2 tsp salt
- Chocolate chips
- Combine oil and sugar and give it some lovin’ until it’s completely mixed with no lumps. You can either use a stand mixer or get in there with your (clean) hands.
- Add the vanilla, coconut milk, and apple sauce to the oil and sugar mixture.
- In a separate bowl, combine the dry ingredients.
- Mix dry with wet and fold in chocolate chips – the batter will be thick!
- Preheat oven to 375℉. While it’s heating, let dough sit or even refrigerate.
- Bake 9 – 10 minutes.
Now, I do have a separate recipe for the in-house cookie moments. When baking a batch for myself, I enjoy adding a peanut butter twist:
- 1/2 cup peanut butter (has to be the real thing! No PB with added oil; you want the kind that you have to stir. This won’t work if PB is dry; can also do a combo of coconut oil + PB)
- 1-1/4 cup sugar (white, brown, or combo of both)
- 1 TBSP maple syrup
- 2 tsp vanilla
- 1/4 coconut milk (the thicker Thai variety, in a can)
- 1/4 cup applesauce
- 2-1/3 cup flour
- 1/4 cup or more of oats (add more coconut milk, apple sauce, or maple syrup if too dry)
- Several dashes of cinnamon
- 1 tsp baking soda
- 1/2 tsp salt
- Chocolate chips or blueberries
Blueberry Oat "Hippie" Cookies
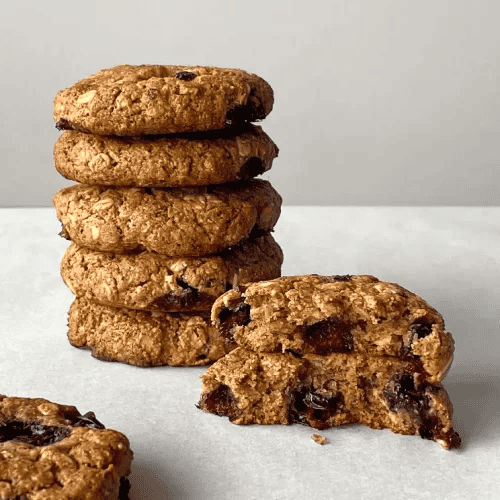
My daughter Tasha recently brought these cookies to our neighborhood block party, and they were a hit! Several people mentioned that the cookies tasted healthy! My next door neighbor called them "hippie" cookies, which we all felt was appropriate so the name stuck.
Although using dried blueberries is highly recommended, you can use fresh blueberries if you omit the apple sauce. If you have time, it is good to rest the dough for 2 hours before baking.
Note: the photo is temporarily being borrowed from the online recipe, and is a placeholder until we remember to take a photo next time...before all the cookies disappear!
Servings: 16 cookies
- 2 TBSP ground flaxseed
- 6 TBSP water
- 1/4 cup mixed nut/seed butter (see recommendations below)
- 1/4 cup peanut butter
- 2 TBSP apple sauce
- 1 cup rolled oats
- 2/3 cup sugar
- 2/3 cup dried blueberries
- 2 tsp vanilla extract
- 2 tsp ground ginger
- 1 tsp cinnamon
- 1-1/2 tsp baking powder
- 1 cup oat flour (you can blend your own from oats)
- In a medium bowl, combine ground flaxseed and water. Whisk and set aside for 15 minutes.
- Once the flaxseeds have soaked up the water, mix in the nut butters, apple sauce, rolled oats, sugar, blueberries and vanilla. Mix until combined.
- In a separate bowl, mix the remaining dry ingredients together. Add the wet mixture to the dry and stir until combined. Add more apples sauce if dough is dry.
- Refrigerate dough for a couple of hours or overnight.
- Preheat the oven to 350 °F / 180 °C.
- Line a baking sheet with parchment paper. Use your hands to shape the dough into balls (you can wet your hands if the dough is too sticky). Flatten the balls a little with the palm of your hands and place them on the baking sheet.
- Bake for 10 - 12 minutes or until the edges are slightly golden. Allow the cookies to cool on the baking sheet for a few minutes before transferring to a wire rack to cool completely.
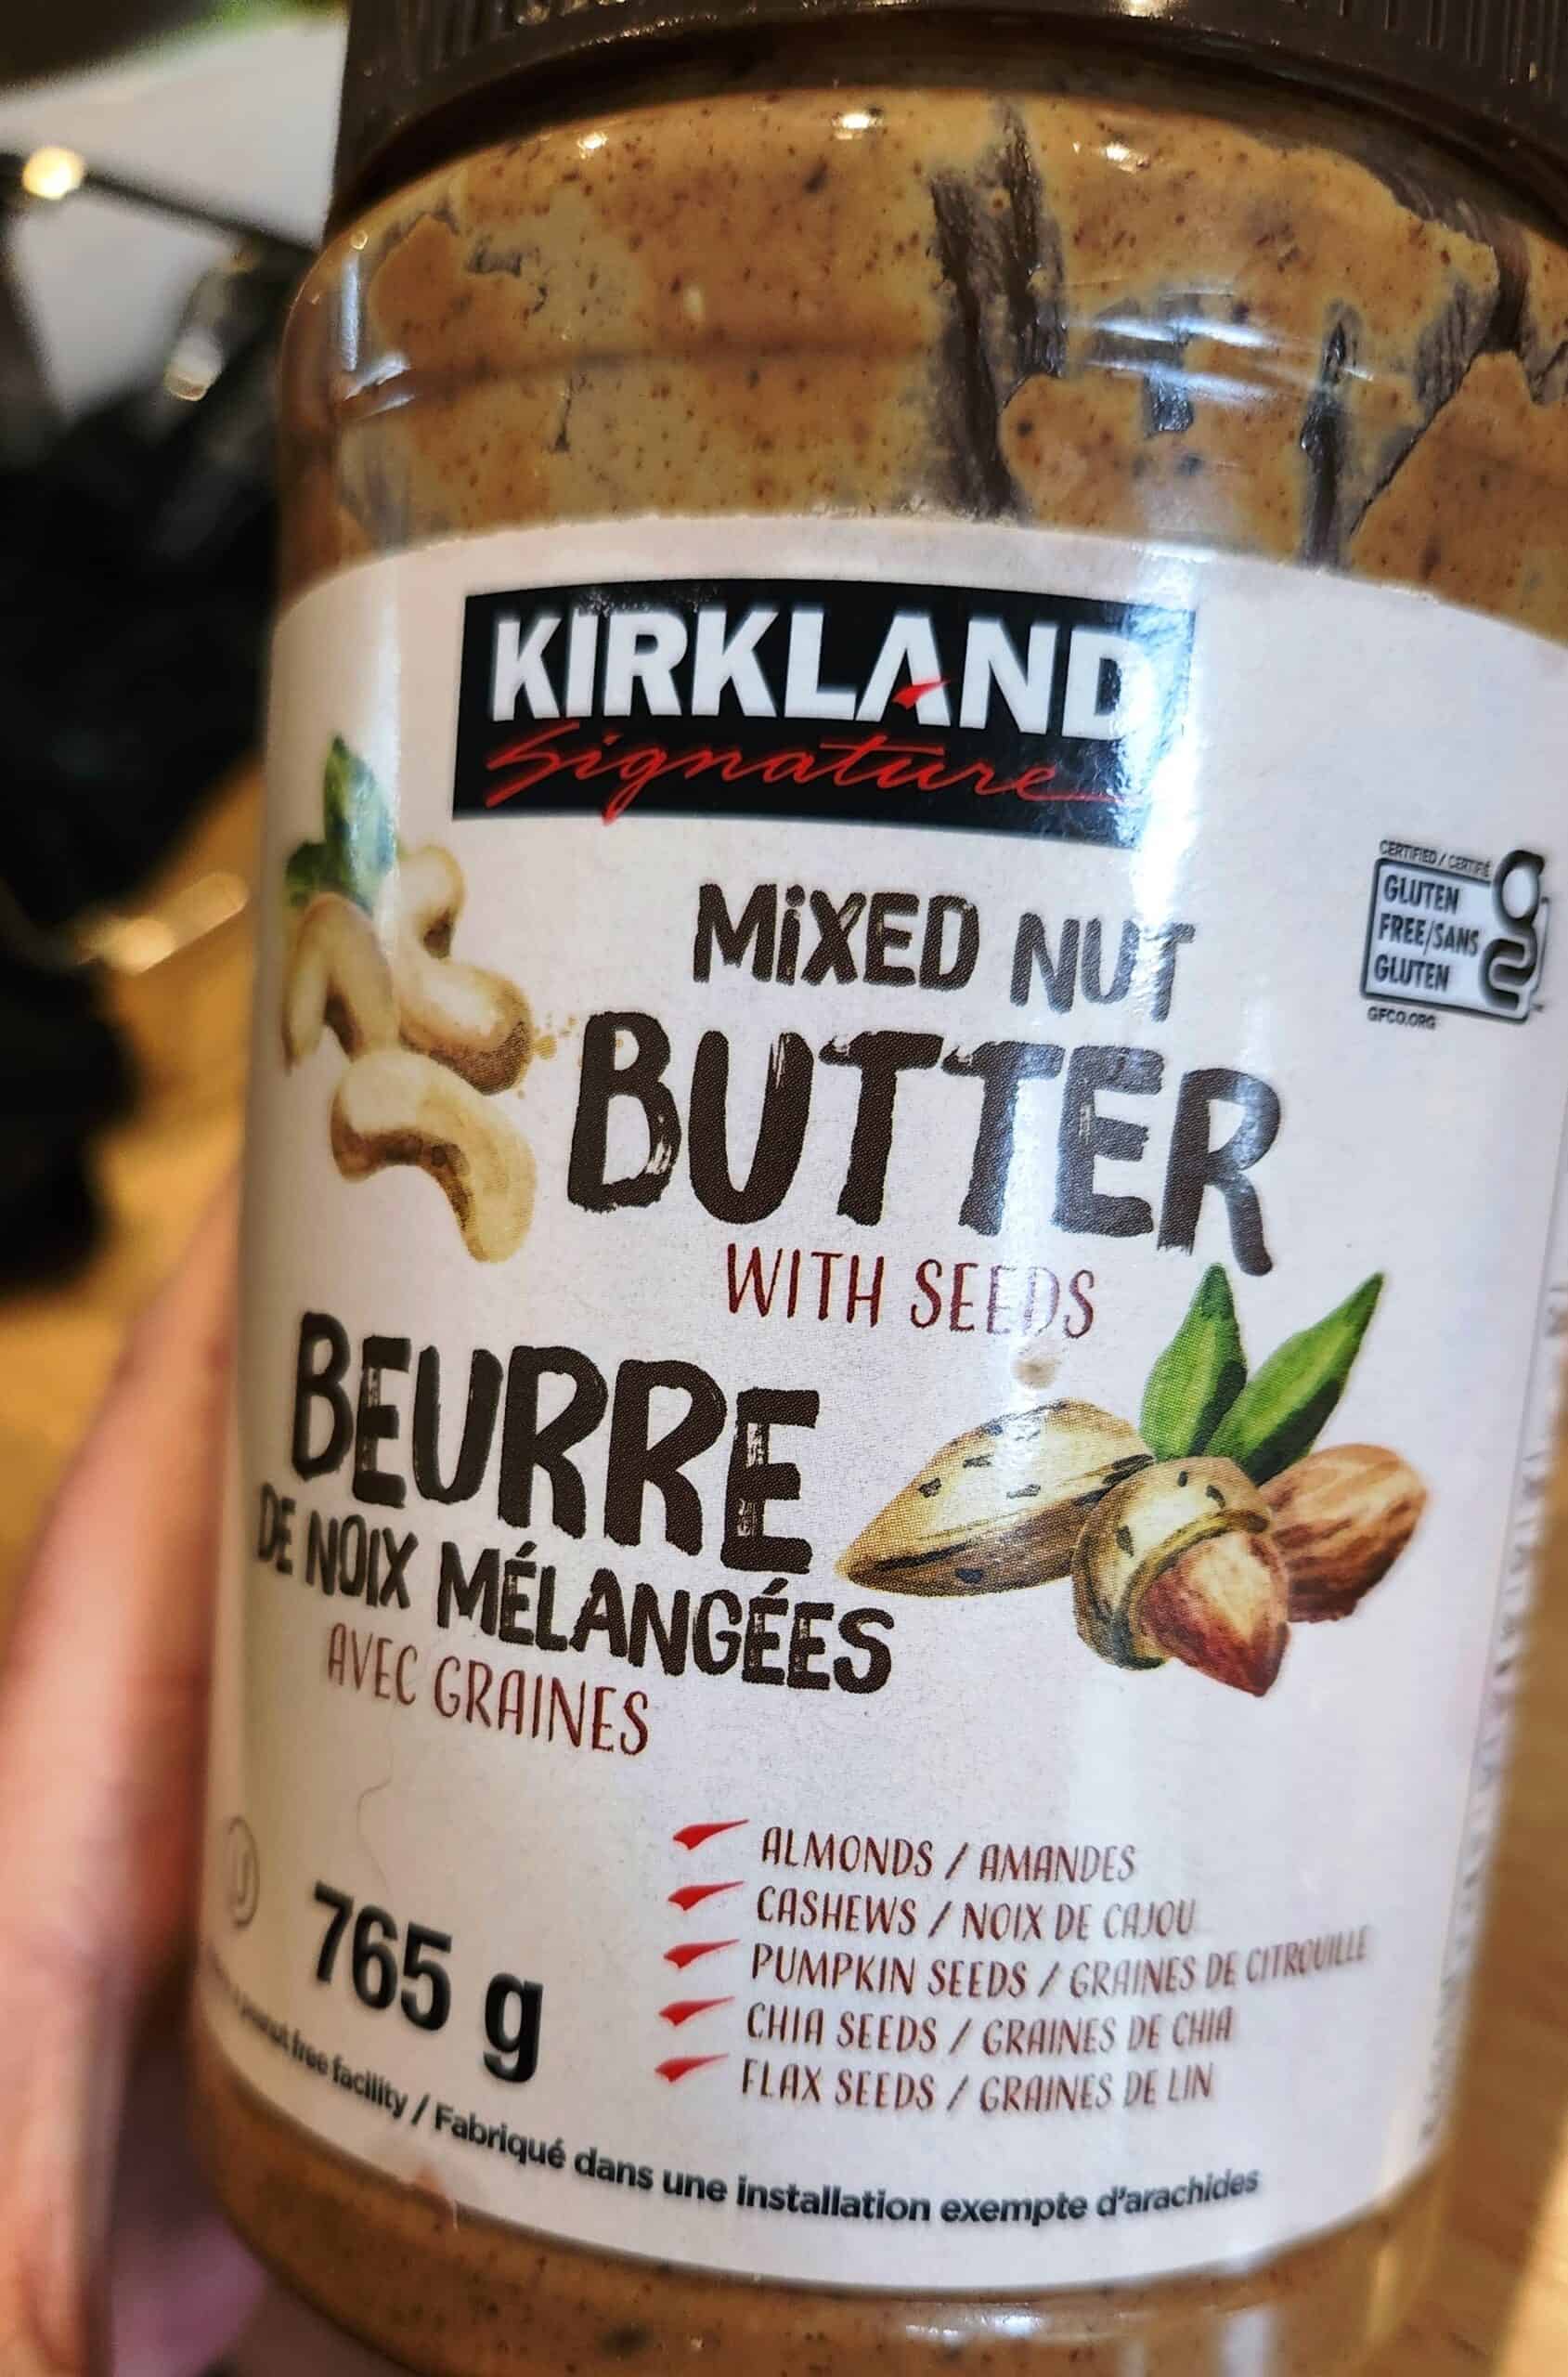
Recommended mixed nut & seed butter: Kirkland brand with almonds, cashews, pumpkin seeds, Chia seeds and flax seeds. Alternatively, substitute with almond butter.
** Recipe adapted from https://mondaydreams.com/
Peanut Butter Cookies
Although these cookies have only 3 ingredients, they are super yummy! And they're great to eat straight out of the freezer.
- 1 cup peanut butter (smooth or crunchy)
- 1 cup brown sugar
- 1 egg
- Combine all ingredients and place in the freezer for a few hours.
- Preheat the oven to 400℉.
- Roll the batter into balls. Place on a baking sheet, then press down and criss-cross with a fork, making them as thick or thin as you like.
- Pop them into the oven for 10-15 minutes, until they are firm but slightly yielding to the touch. Adjust the temperature and length of time as needed based on your oven.
Oatmeal Chocolate Chip Coconut Cookies
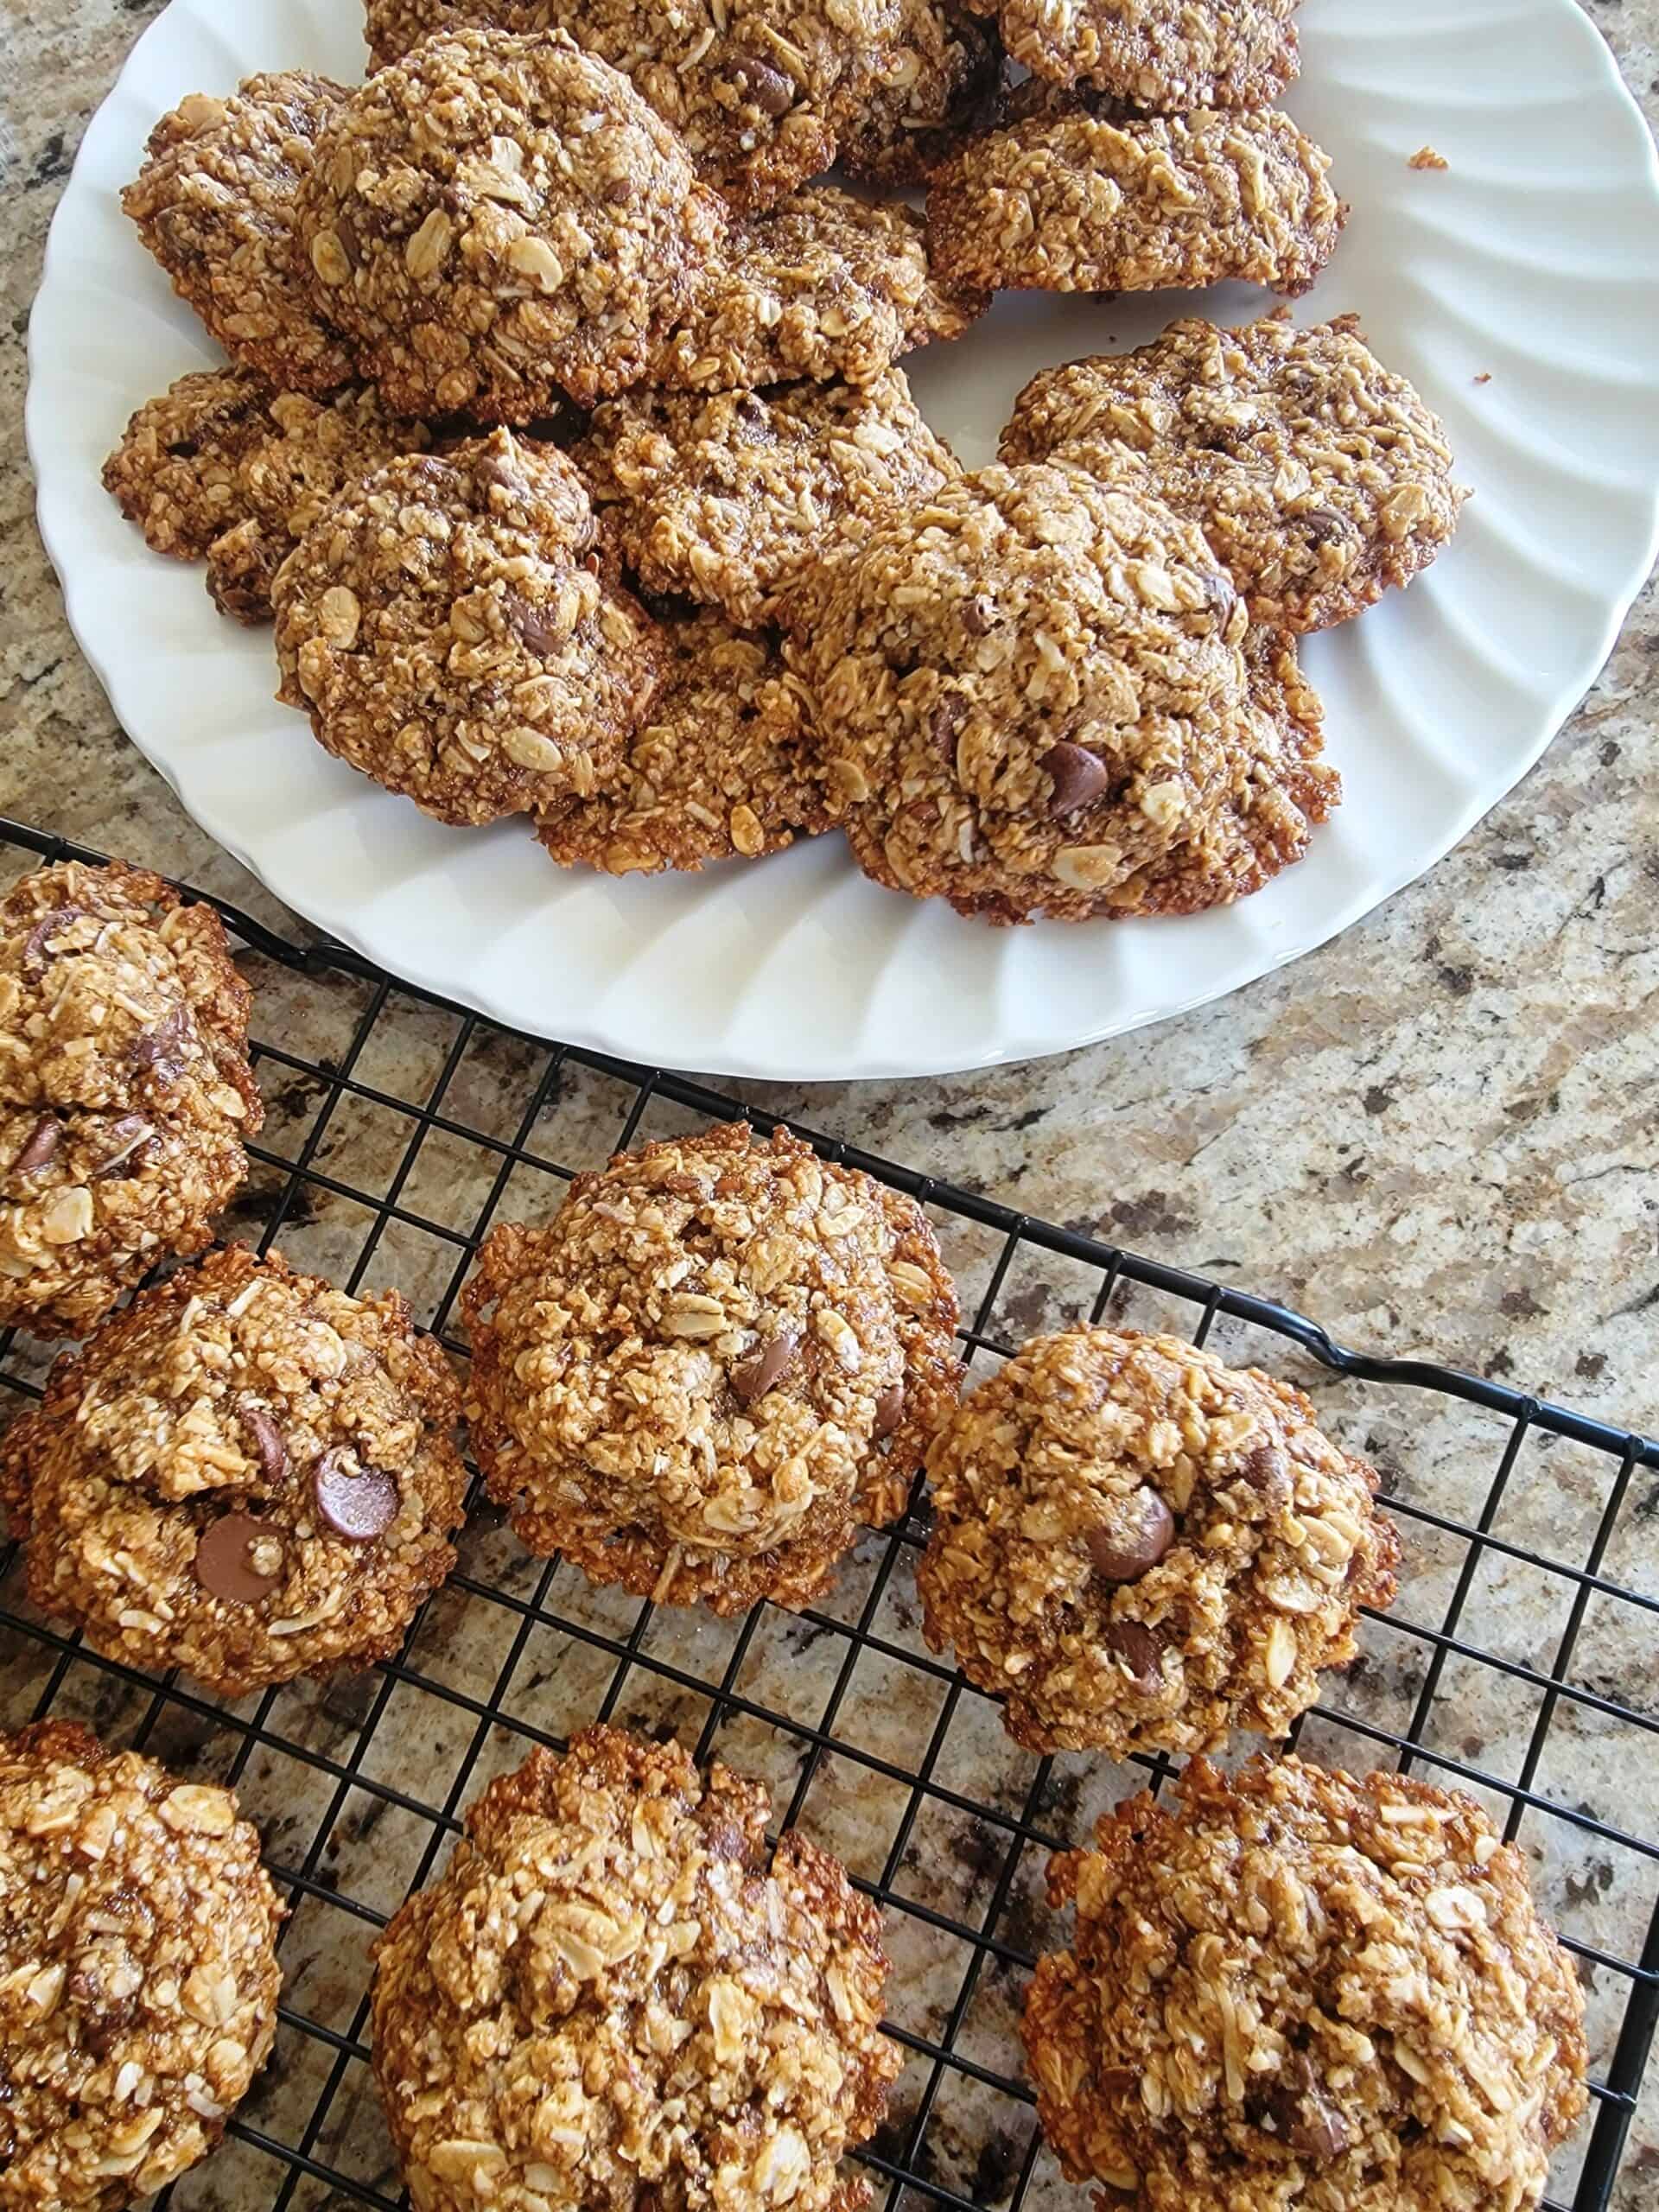
If you love coconut like I do, then you will love these! They are basically chocolate chip cookies with oats and coconut, and are deliciously soft and chewy. As you can see below, you can easily make these cookies vegan and gluten free. Please let me know if you make these!
Servings: 24 cookies
- 2 TBSP ground flax seeds
- 6 TBSP water
- 1 cup regular or certified GF rolled oats
- 1-1/2 cup oat flour (make your own by blending regular or GF oats)
- 1/4 cup dried shredded coconut
- 1/4 tsp baking soda
- 1/2 tsp salt
- 1/2 cup coconut oil (soft, not melted)
- 1 tsp vanilla extract
- 3/4 cup coconut sugar (can use part brown sugar)
- 3/4 cup chocolate chips (vegan if needed)
- Preheat oven to 350°F.
- Line your baking sheet(s) with parchment paper.
- Make flax eggs by whisking together the ground flax seeds and water. Set aside to thicken.
- In a medium bowl, whisk together the rolled oats, oat flour, shredded coconut, baking soda and salt.
- In a large bowl, mix together the flax mixture, soft coconut oil, vanilla and coconut sugar. Add the dry ingredients to the wet ingredients and mix until combined.
- Fold in the chocolate chips.
- Using a tablespoon, scoop equal amounts of dough onto the baking sheet(s). Flatten slightly. Leave space around each cookie, since they will spread a little as they bake.
- Bake for 10 minutes or until golden around the edges. Don't over bake! They will be very soft, but will firm up as they cool.
- Leave cookies on the cookie sheet to cool for about 10 minutes, then remove and place on a cooling rack.
** Recipe adapted from https://delightfuladventures.com/oatmeal-chocolate-chip-coconut-cookies/
Peanut and Date Energy Bites
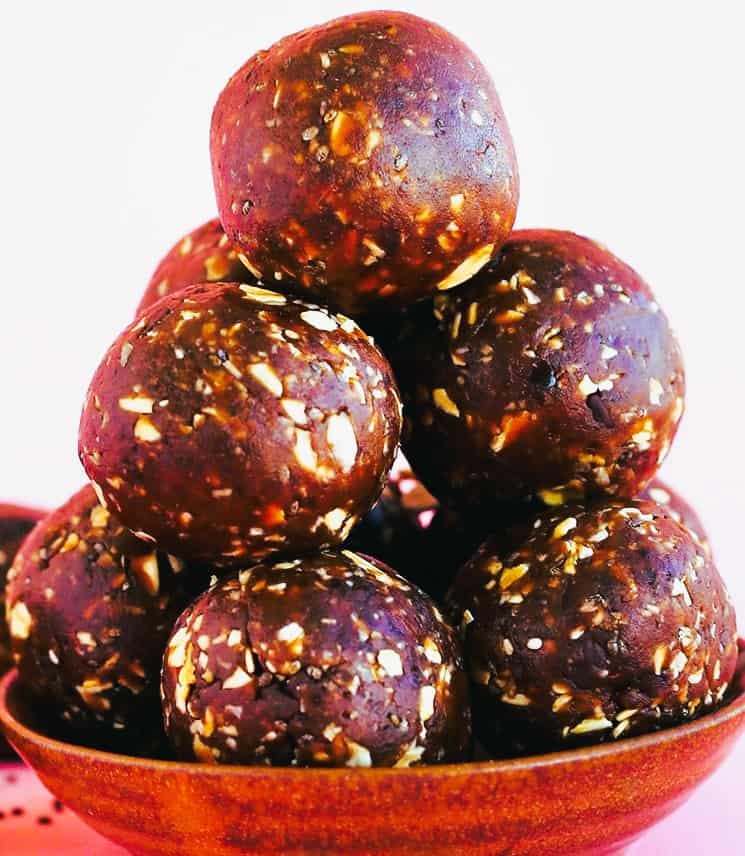
This is a 5-ingredient no-bake snack that is easy to make, and is full of fiber, protein and healthy fats. I must warn you that it is hard to eat only one!
Servings: 15 balls
- 1 cup pitted dates
- 2/3 cups rolled oats (gluten-free as needed)
- 1 TBSP chia seeds (or substitute flax or hemp seeds)
- 1/4 cup dairy-free dark chocolate (roughly chopped)
- 3 TBSP all-natural salted peanut or almond butter
- Optional flavoring: maple syrup, vanilla, cinnamon
- Soak dates in warm water for 10 minutes. Drain.
- Place dates, oats, chia seeds and optional flavoring into a food processor or blender. Pulse until the mixture is crumbly or forms a ball.
- Add the chocolate. Pulse or mix until combined.
- Finally, mix in the peanut butter. You want the consistency to have small pieces and not be overly processed.
- Carefully roll into 1-inch balls, using the warmth of your hands to mold them together. You should end up with about 14 to 15 balls.
- To set, place in the fridge or freezer for 15 minutes. Or you can eat them as is! They will keep fresh in an air-tight bag or container for up to a week. Freeze them for longer term storage.
** Recipe adapted from https://minimalistbaker.com/5-ingredient-peanut-butter-cup-energy-bites/
Boterkoek
This is one of my mom's Dutch recipes, and was always a favorite of mine while growing up. It's the almond flavoring and the brownie consistency that makes it so good. As an adult, I would bring this to potlucks, and since it doesn't look very fancy, typically no one would gravitate towards it. But I always noted that once one person tried it, and word spread of how yummy it was, it would disappear in a flash!
The translation of boterkoek is "butter cake". But as I mentioned, the consistency is more of a brownie than a cake. I have yet to try to veganize this recipe, but it's on my to-do list!
The most important thing to note when making boterkoek is that you must NOT use a mixer. That ruins the yummy consistency. Instead, let the butter soften and then use your hands to mix the ingredients. Note also that you absolutely must not replace the butter with margarine, since this will result in an oily mess!
- 1 cup butter
- 2/3 cup white sugar
- 2/3 cup brown sugar
- 1 egg
- 1 tsp almond flavor (I love almond flavor, so I double this)
- 2 cups flour
- 1/2 tsp baking powder
- 1/2 tsp baking soda
- Use your hands to knead into a ball until all the dry ingredients are incorporated into the butter.
- Place in 8" square pan and pat down to flatten. I typically run a fork lightly across the top to make it look more interesting.
- Bake at 325℉ for 30-45 minutes. The boterkoek is done when the edges are brown and have separated from the edge of the pan. The center may collapse a little during cooling.
BREADS and MUFFINS
Krentenbrood
Anyone in our family will know that no cookbook is complete without paying tribute to my Dutch heritage! The Dutch word "krenten + brood" can be translated as "currant bread", though it is much more of a heavy cake than a loaf of bread.
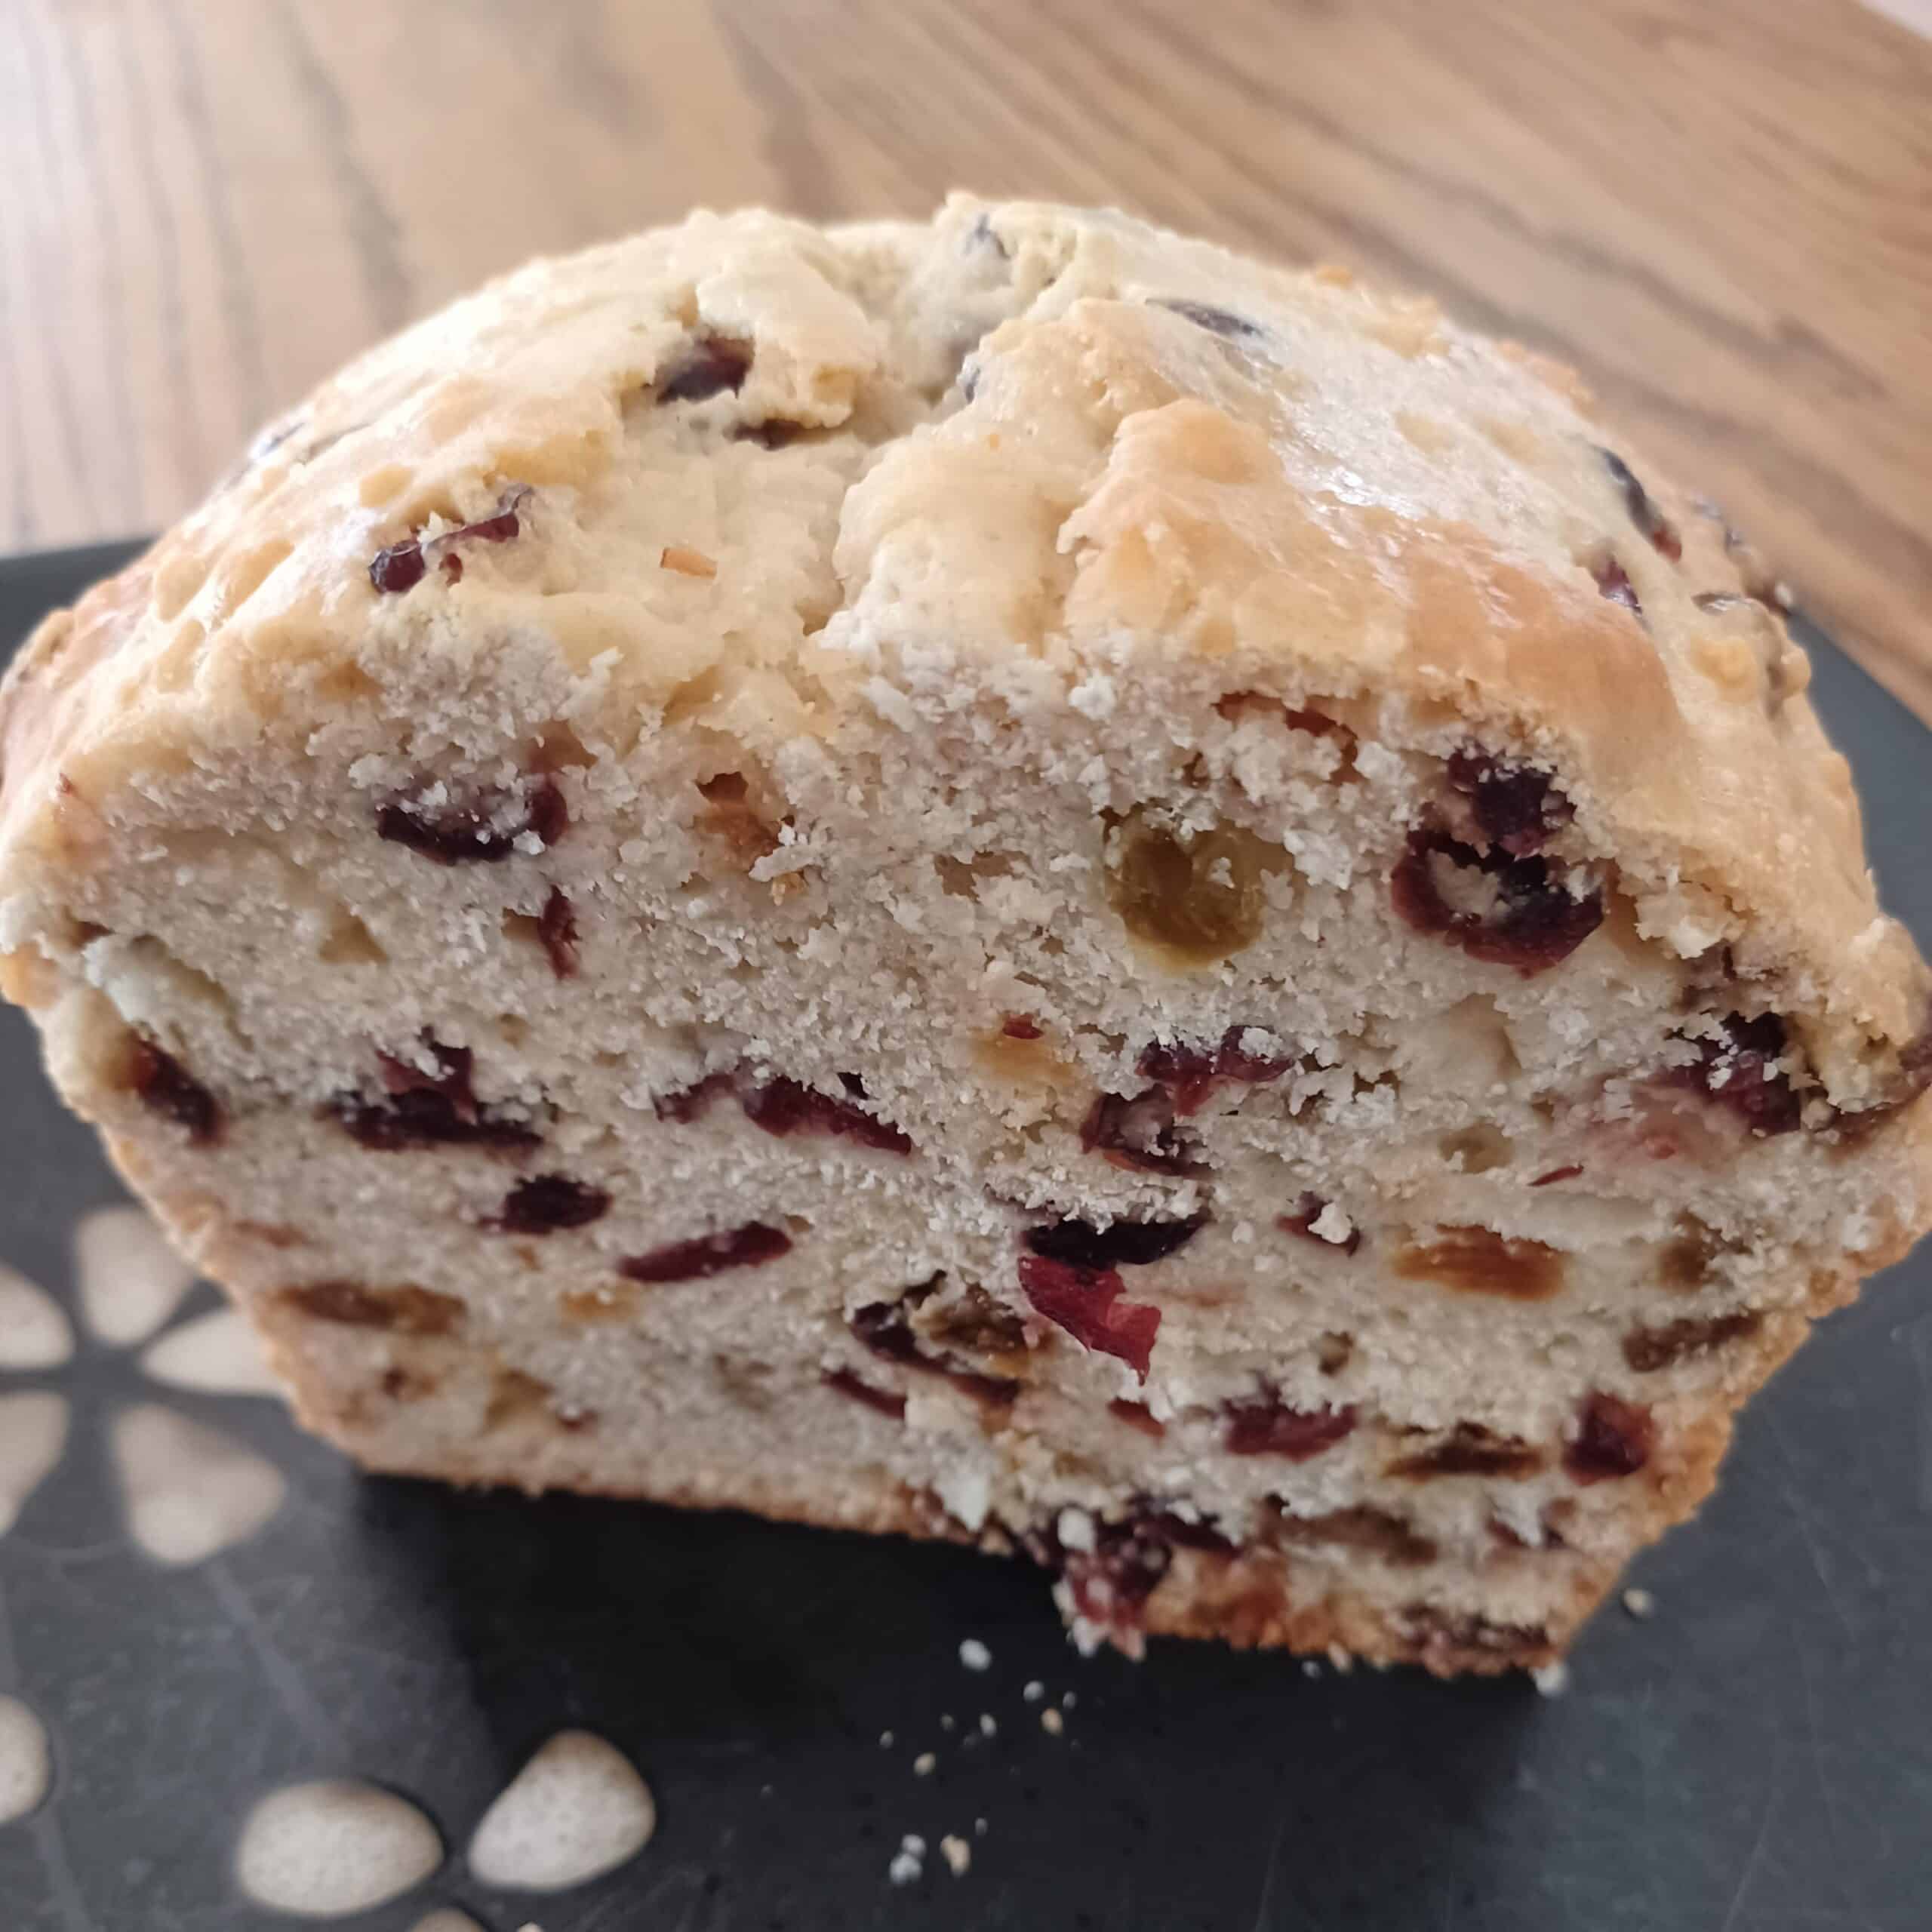
Since this is a metric recipe, I always use my Canadian 1.5L loaf pan which is slightly larger than the imperial 1.5QT pan. But no worries about overflowing, as this dough barely rises at all. And I haven't tried a GF version, but as for vegan, substituting with homemade non-dairy buttermilk works just fine!
- 4 cups flour
- 1 cup sugar
- 1 tsp salt
- 1 tsp baking soda
- 1 tsp cream of tartar
- 2+ cups currants, raisins, fruit bits, dried cranberries, etc.
- 1/4 cup melted butter, margarine or coconut oil
- 1 egg
- 1/2 liter buttermilk (2 cups)
Mix together with a large spoon (do not use mixer!). The dough will be quite thick. Place in a buttered loaf pan coated with Graham Cracker crumbs.
Bake approximately 1-1/2 hours at 300℉. The top should be golden and a toothpick should come out clean. Slightly cool, then transfer to a cooling rack.
Slice and eat, or spread on some butter and jam!
Zucchini Bread
I've been making this zucchini bread for decades. It's moist with a yummy cinnamon flavor. Feel free to change up the spices, perhaps a pumpkin spice for fall?
This makes 2 small loaf pans.
- 3 eggs
- 2 cups sugar
- 1 cup oil
- 2 cups grated raw zucchini
- 2 tsp vanilla
- 3 cups flour
- 1 tsp salt
- 1 tsp baking soda
- 1/4 tsp baking powder
- 3 tsp (1 TBSP) cinnamon
- 1 cup nuts (optional)
- Beat eggs.
- Add sugar, oil, zucchini and vanilla.
- Add dry ingredients.
- Bake at 350℉ for 1 hour.
GF Zucchini Bread
This gluten-free zucchini bread is lightly sweet, moist and delicious. It makes 3 mini (3x5) loaves or one 5x9 loaf. I normally use the mini loaves because when our garden produces an overload of zucchini and our neighbors start avoiding us, it's easier to give away zucchini bread than more zucchini!

Dry ingredients:
- 1 cup gluten free 1:1 flour
- 1/4 cup almond flour
- 2 tsp baking powder
- 1/2 tsp baking soda
- 1/2 tsp salt
- 2 tsp cinnamon
- 1/4 tsp nutmeg
Other:
- 1/4 cup brown sugar
- 1/2 cup white sugar
- 2 eggs
- 1/3 cup vegetable oil
- 1/4 cup almond milk
- 1 tsp lemon juice
- 2 tsp vanilla
- 1 cup finely grated zucchini (about 1 large), squeezed of excess water
- 1/2 cup chopped walnuts or chocolate chips
- Preheat oven to 350℉. Grease loaf pan(s) with cooking spray.
- In a medium bowl, combine the dry ingredients.
- Add the sugars, eggs, oil, milk, lemon juice and vanilla. Using a hand mixer, mix on low to combine.
- Add the zucchini and mix for 30 seconds on low. Add the walnuts or chocolate chips and stir to combine.
- Pour batter into the loaf pan(s). Bake for 30-35 minutes, until toothpick comes out clean. Let sit for 10 minutes before removing from pan, then transfer to a cooling rack.
** Recipe adapted from https://meaningfuleats.com/gluten-free-zucchini-bread/
Pumpkin Loaf
This gluten-free and dairy-free pumpkin loaf is moist, dense and full of flavor. And it's even better when you add some chocolate chips! Make sure to use gluten free 1-1 baking flour that includes Xanthan gum.

- 1 cup canned pumpkin (not pie filling!)
- 1 tsp baking soda
- 1/2 tsp GF baking powder
- 1/4 tsp salt
- 3/4 cup granulated sugar
- 1/2 cup brown sugar
- 2 tsp pure vanilla extract
- 3 large eggs
- 1/3 cup vegetable oil
- 1 1/2 cups gluten free 1-1 baking flour
- 1 tsp cinnamon
- 1 TBSP pumpkin pie spice
- 1/2 cup chocolate chips (optional)
- Preheat oven to 350℉.
- Line 5X9 loaf pan with parchment paper.
- In a large bowl, add pumpkin, baking soda, baking powder and salt. Mix with whisk to combine.
- Add in the sugar, brown sugar and vanilla. Whisk until fully combined and smooth.
- Add the eggs and vegetable oil to the batter and mix until smooth
- Add in the flour, pumpkin pie spice and cinnamon. Mix until fully combined and smooth. The batter will be thick.
- Optionally mix in the chocolate chips.
- Spoon the batter into the loaf pan. Bake for 50-60 minutes, or until a toothpick into the middle comes out clean.
- Using the parchment paper, lift the loaf out of the pan onto a wire rack. Allow it to cool 10 minutes before slicing.
** Recipe from mamaknowsglutenfree.com
Joan's Bran Muffins
I've been making these muffins for decades, even before Joan became my mother-in-law! My favorite way to make these is with a whole ton of golden raisins 😋! But you can replace the raisins with other fruit, chocolate chips, mashed banana, or whatever tickles your fancy.
This recipe is quick to make, and don't bother with a blender. All you need is a whisk.
Servings: 12 muffins
- 1 egg
- 3/4 cup vegetable oil
- 1 cup sour dairy-free milk (see note below)
- 1 cup brown sugar
- 1 cup flour
- 1 tsp baking soda
- 1/2 tsp salt
- 1-1/4 cup bran
- 1-1/2 to 2 cups golden raisins or filling of your choice
- Preheat oven to 350℉.
- Whisk egg in a small bowl. Whisk in the oil, followed by the milk.
- Combine all dry ingredients (except the bran) into a separate, larger bowl.
- Add the wet ingredients, and whisk until dry ingredients are completely blended.
- Add the bran and raisins, stirring until all the bran is absorbed.
- Pour into muffin cups and bake for 20 - 25 minutes, until pressing top of muffin no longer causes an indentation.
** Sour milk: For each 1 cup of milk, add 1 TBSP lemon juice. Stir. Let sit at least 5 minutes.
** For GF option: Use GF 1-1 baking flour. Replace wheat bran with OAT bran.
DESSERTS
French Apple Pie
Back in 1982, I was given a hard-cover Betty Crocker cookbook, which is now completely tattered, stained and falling apart. But I'm still using the apple pie recipe that's been bookmarked for decades, and decided it's finally time to save it here!
Personally, I love fruit pies with crumb topping, so that's what I describe here. However, I did add note #1 below for how to make a 2-crust pie if that's what you prefer.
- Pastry for 9-inch pie
- 3/4 cup sugar
- 1/4 cup all purpose flour
- 1/2 tsp ground nutmeg
- 1 tsp ground cinnamon
- Dash of salt
- 6 cups thinly sliced tart apples (about 6 medium); I use Granny Smith apples
For the crumb topping:
- 1 cup all-purpose flour
- 1/2 cup firm margarine
- 1/2 cup packed brown sugar
- Preheat oven to 425℉.
- Prepare the pastry. I typically don't make my own, instead I use the Pillsbury 9-inch rolled pie crust.
- Mix sugar, flour, nutmeg, cinnamon and salt. Stir in the apples, coating them thoroughly.
- Spread apple mixture evenly into the pasty-lined pan.
- Combine crumb topping ingredients using a pasty cutter so that the topping remains crumbly.
- Sprinkle crumb mixture evenly over the apples. Do not press it down.
- Cover edge with a strip of foil (or see note #2 below). Remove foil during the last 10 minutes of baking.
- Bake until crust is brown and juice begins to bubble, about 45 to 50 minutes.
Notes:
- For a 2-crust pie, dot apples with 1 TBSP margarine before adding the top crust. Cut slits in the crust, then seal and flute. As with the crumb topping, cover the edges with foil and remove during the last 10 minutes of baking.
- I find that using foil to cover the edges of the pie is quite fiddly. Instead, you can use a disposable aluminum pie plate and cut a large circle out of the middle. Then place it upside down over the pie so that it covers the edges but exposes the middle. You can re-use the same cover over-and-over!
** Recipe from the Betty Crocker Cookbook, printed 1982
Vegan GF Blueberry Peach Crisp
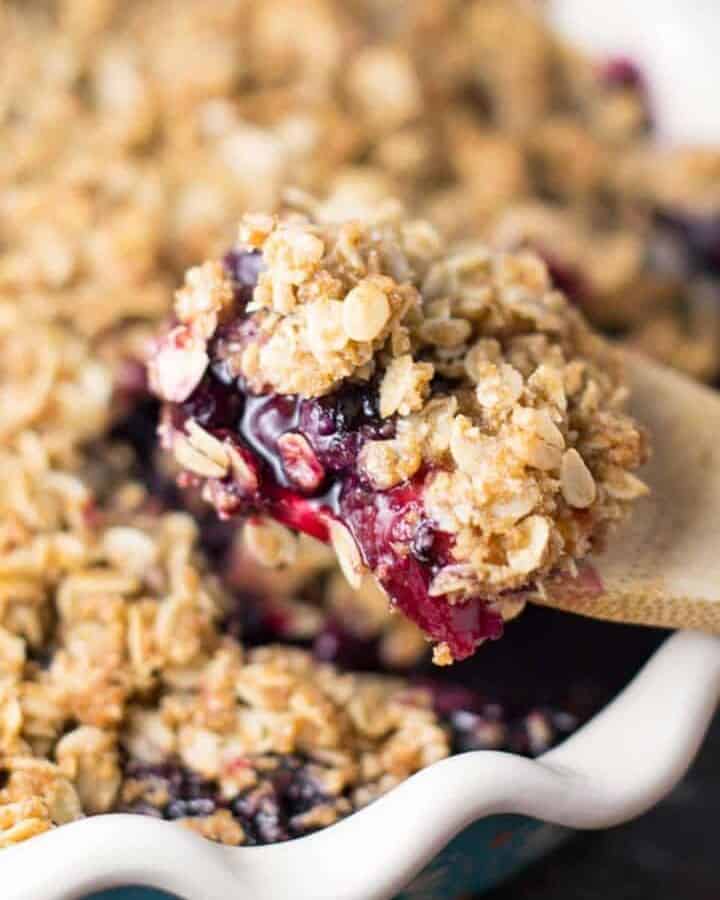
This is an easy dessert to make, and yes, it's dairy free and gluten free! The prep time is minimal since the recipe uses frozen fruit which eliminates any peeling, coring or chopping. Having said this, I do find that if you use sliced peaches, they will need to be chopped into bite-sized pieces for the best results. And of course you can replace the peaches with any other fruit of your choice.
This crisp is best served fresh with a scoop of dairy free vanilla ice cream. Of course it's still totally yummy the next day, though it just won't be quite as crispy.
For the fruit layer:
- 2 cups frozen peaches, cut into bit-size pieces and thawed for 10 minutes
- 4 cups frozen blueberries, thawed for 10 minutes
- 1/4 cup sugar
- 2 TBSP corn starch
- 1/4 tsp salt
- 1/2 tsp cinnamon (or more!)
For the topping:
- 3/4 cup brown sugar
- 1/2 cup gluten free oat flour (you can make your own by blending GF oats)
- 3/4 cup gluten free rolled oats
- 1/4 tsp salt
- 2 TBSP coconut oil, melted
- 1/4 cup vegan butter, melted
- Preheat oven to 350℉.
- In a large bowl, mix all the ingredients for the fruit layer. The berries should be thawed enough so that the dry ingredients stick to the fruit. Spread the fruit into an 8X8 pan or a pie dish.
- Mix together the topping ingredients (I just use the same bowl). It will be fairly wet. I find that it mixes more easily when I use my hands.
- Sprinkle crumb mixture evenly on top of the fruit.
- Bake for 50-60 minutes, or until bubbling and the top starts to brown. Rest for 10-15 minutes before digging in (I know this will be hard!). Serve with ice cream.
** Recipe adapted from buildyourbite.com
Wendy's Apple Crisp

I've been making this apple crisp for decades, and it's still a family favorite! I often get lazy and don't bother peeling the apples, in which case you have to make sure that your apple pieces aren't too large.
My favorite apple for this dessert is Granny Smith since they are tart and crunchy. One apple that I would avoid is Gala since they seem to make the crisp more watery.
My husband loves the crust as thick as possible, so I've included instructions for both a regular crust and a thick crust!
For the fruit layer:
- 4 medium Granny Smith apples, peeled and sliced (4 cups)
- 1/4 cup white sugar (for tart results), or to taste
- 2 TBSP flour (you can also use corn starch)
For the topping:
| For normal crust | For thicker crust |
|---|---|
| 1/3 cup softened butter | 1/2 cup softened butter |
| 1/2 cup flour | 3/4 cup flour |
| 1/2 cup quick oats | 3/4 cup quick oats |
| 3/4 cup brown sugar | 1 cup brown sugar |
| 1 tsp cinnamon | 1+ tsp cinnamon |
| 1/2 tsp nutmeg | 1/2 tsp nutmeg |
- Preheat oven to 375℉.
- Spray bottom and sides of an 8X8 glass pan with cooking spray.
- Mix white sugar and 2 TBSP flour into the sliced apples, and spread apple mixture into pan.
- Cut butter into remaining dry ingredients until crumbly, using a pastry cutter. Sprinkle over apples (do not pat down).
- Bake for 30 minutes or until golden brown (apples should be bubbling).
- Serve warm.
Chocolate Mousse Pie

American Seventh-day Adventists have learned to use plant foods like tofu to reinvent classic comfort-food desserts like chocolate mousse pie in a healthier way. This yummy dessert is dairy free, and can be made gluten free if using GF Graham Cracker Crumbs, no baking required. Or if you're like me when I took the photo and don't have a crust handy, you can just eat the mousse straight out of a bowl! Yum!
This mousse is very rich. For a lighter mousse, I have found that stirring in a big spoonful of coconut whipped topping (freezer section) or coconut whipped cream after blending makes the mousse a little lighter and adds a nice hint of coconut!
Servings: 8
- 1-3/4 cups semisweet chocolate chips (or dark chocolate for DF)
- 12 ounces silken tofu, drained and patted dry
- 1/2 cup plant-based milk
- 1 tsp vanilla (optional)
- 1 tsp instant coffee (optional)
- Ready-made graham cracker pie crust (optional)
- Berries, chopped nuts or coconut whipped cream for topping (optional)
- Melt the chocolate chips in the microwave in 30-second increments.
- Puree melted chocolate in a blender with the tofu, almond milk and optional vanilla & coffee until smooth, about 1 minute.
- Pour the mixture into your crust (if using) and smooth with a knife. Cover and freeze until set, about 30 minutes. If not using a crust, pour into dessert bowls and refrigerate for 15 minutes.
- Optionally, top with berries, chopped nuts or coconut whipped cream.
** Recipe adapted from The Blue Zones Kitchen cookbook